Continuing on from Part 1, where I upgraded the external PSC appliances, Part 2 of this post will now continue the upgrade sequence and upgrade the vCenter Server Appliance 6.0 to the 6.5d release. As previously with the PSC appliance upgrade, the vCSA 6.5 upgrade follows the same two stage approach. The first stage is to deploy a new appliance and the second stage is to copy the data from the 6.0 appliance to the new 6.5 appliance.
Stage 1 – Deploy the new vCenter Server Appliance
In stage 1, I will deploy the OVA file of the vCenter 6.5 appliance. Mount the ISO and navigate to the \vcsa-ui-installer\ directory and then to the required subdirectory for your OS:
- For Windows OS, go to the win32 subdirectory, and run the installer.exe
- For Linux OS, go to the lin64 subdirectory, and run the installer
- For Mac OS, go to the mac subdirectory, and run the Installer.app
Ensure you have a full backup or snapshots of all the required machine before commencing.
I’m running my upgrade from a Windows machine so I will run \vcsa-ui-installer\ win32\installer.exe

Select Upgrade from the vCenter Server Appliance 6.5 Installer

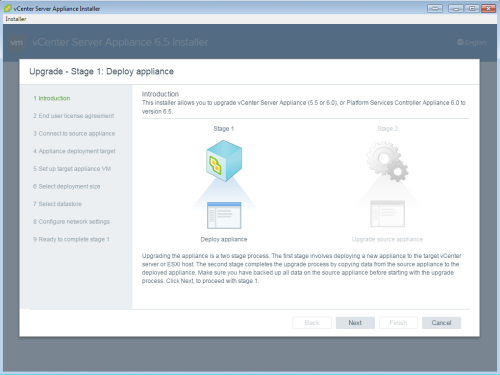
The introduction provides an overview of the stages required to complete the upgrade. Click Next.

Accept the End User License Agreement and click Next

Enter the FQDN of the existing vCenter Server Appliance, this is the first vCSA 6.0 I installed, along with the required credentials. Then enter the ESXi host for the source vCSA. Click Next

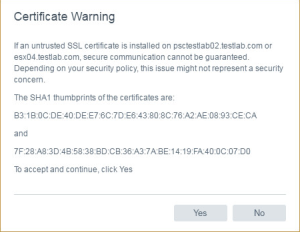
Click Yes on the Certificate Warning to continue.

Enter the ESXi host FQDN where you would like the new vCSA 6.5 appliance deployed. Click Next

Click Yes on the Certificate Warning to continue.

Enter the name for the vCSA appliance VM and set a root password. Click Next.

Select the deployment size you would like for your environment. For my home lab, I selected Tiny

Select a datastore for the vCSA and if you would like to enable Thin Disk Mode. Click Next.

Now select a network with ephemeral port binding, this is temporary and the new vCSA appliance can be moved to another network after the upgrade has completed.
Enter the temporary network identity in the required fields. It’s worth noting at this point that the temporary names and IP addresses used during the upgrade all need to be resolvable by DNS. Once the upgrade has completed, the appliance frees the temporary IP address and assumes the network settings of the source 6.0 appliance.

Review the summary on the Ready to complete stage 1 page, verify the settings and then click Finish

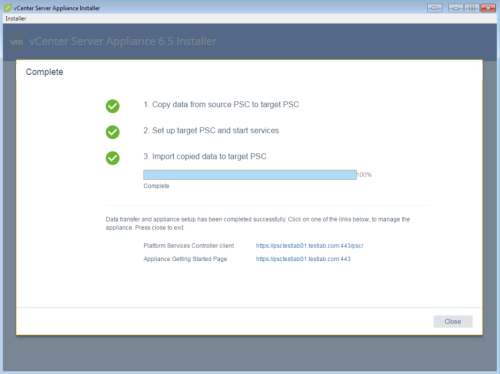
Once the deployment has completed, click Continue to progress to Stage 2. If you close, you can continue with Stage 2 by navigating to the VAMI of the newly deployed vCenter Server appliance, https://vma01tmp.testlab.com:5480

Stage 2 – Copy Data from source vCenter Server Appliance to the vCSA 6.5 appliance
After completing stage 1, you will be taken to stage 2 and the introduction page. Click Next.

Confirm the source vCenter Server and ESXi host information. This will be pre-populated from Stage 1 unless you closed the Upgrade after Stage 1. If so, you we need to re-enter the information. Click Next

A pre-upgrade check will run and display it’s results. The check highlighted an internal error during the vSphere ESX Agent Manager upgrade checks. I managed to find a resolution to this error in the VMware communities
https://communities.vmware.com/thread/557876

Navigate to the source vCSA Managed Object Browser, https://vmatestlab01.testlab.com/mob – you will need to authentication with SSO administrator credentials.
Click content

Click ExtensionManager

Click UnregisterExtension and a new window will appear for the UnregisterExtension

Enter com.vmware.vim.eam in the value field and click Invoke Method

This unregisters the plug-in and results in void

Refresh the Managed Object Browser and verify the plug-in has been unregistered

Stop the vmware-eam service on the source vCSA appliance by running service-control –stop vmware-eam from the shell
Once the vmware-eam service is stopped, you can continue. Click Next

It’s likely you will be required to enter your password again due to the session expiring. Enter your password and click Log in

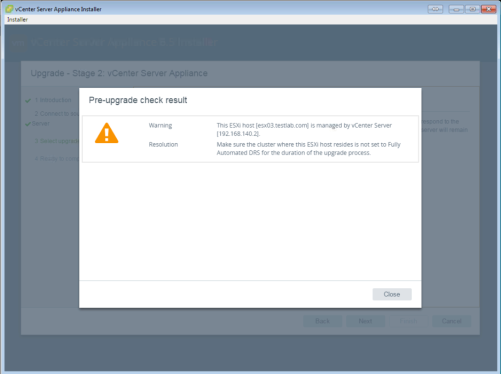
The pre-upgrade check will run again and display it’s results. This time, the check only highlighted that DRS should not be set to Fully Automated on the cluster where the ESXi host resides during the upgrade process. As in part 1, I configured the DRS Automation Level to manual.
You now need to select the data you would like to migrate form the course vCSA 6.0 appliance, I decided to take all of the data. Select the option for your environment and click Next

Review the summary information on the Ready to complete page, check I have backed up the source vCenter Server and all the required data from the database and click Finish

At this point, the installer will display a notice stating the source vCSA appliance will be shutdown once the network configuration has been enabled on the new vCSA 6.5 appliance. This is a useful option as the source vCSA configuration and data is left intact for easier rollback, if required. Click OK

If all goes well, the data should be copied and the source vCSA shutdown. The new vCSA 6.5 should be powered on and accessible with your source network identity. At this point I renamed the VMs in vCenter for convenience.

You now need to upgrade all vCSAs in your SSO domain before proceeding to upgrade the ESXi hosts. I will finish this blog series in Part 3 when I complete the upgrade of my ESXi hosts.