Deploy Embedded PSC with Enhanced Linked Mode – Part 2

Stage 2 – Setup the vCenter Server Appliance with Embedded PSC

After completing stage 1, you will be taken to stage 2 and the introduction page.

Click Next

2.5.1

Either select Synhronize time with NTP servers or  Synchronize time with ESXi host (depending on your preference).  Enter NTP servers (if required) and select Enabled from the SSH access dropdown.

Click Next

2.5.2

As this is the first VCSA with Embedded PSC, select the Create a new SSO domain radio button

Enter the name for the Single Sing-On domain name: vsphere.local
The Single Sign-On user name is administrator and cannot be changed
Enter the Single Sign-On password and confirm the password
Enter the Single Sign-On Site name: default-site

Click Next

2.5.3

Select the checkbox if you would like to join the VMware Customer Experience Improvement Program

Click Next

2.5.4

Review the summary on the Ready to complete Install – Stage 2 page, verify the settings and then click Finish

2.5.5

Click OK to the warning message

2.5.6

If all goes well, the VCSA setup should complete successfully. You can navigate to https://vmatestlab01.testlab.com/vsphere-client to go to the vSphere Web Client, https://vmatestlab01.testlab.com/ui to go to the HTML5 client or click the https://vmatestlab01.testlab.com:443 to go to the Appliance Getting Started Page.

Click Close

2.5.7

Deploy second VCSA appliance following previous steps in part 1 Deploy Embedded PSC with Enhanced Linked Mode – Part 1

After completing stage 1, you will be taken to stage 2 and the introduction page.

Click Next

2.5.8

Either select Synhronize time with NTP servers or  Synchronize time with ESXi host (depending on your preference).  Enter NTP servers (if required) and select Enabled from the SSH access dropdown.

Click Next

2.5.2

Select the Join an existing SSO domain radio button to join the existing SSO domain of the first deployed Embedded PSC VCSA appliance

Enter the FQDN of the first VCSA with Embedded PSC: vmatestlab01.testlab.com
Enter the HTTPS port: 443
Enter the Single Sign-On name: vsphere.local
The Single Sign-On user name is administrator and cannot be changed
Enter the Single Sign-On password

You will notice there is no longer an option to enter the SSO site name. For greenfield deployments, SSO sites are no longer available for new deployments.

2.5.10

Select the checkbox if you would like to join the VMware Customer Experience Improvement Program

Click Next

2.5.11

Review the summary on the Ready to complete Install – Stage 2 page, verify the settings and then click Finish

2.5.12

If all goes well, the second VCSA setup should complete successfully. You can navigate to https://vmatestlab02.testlab.com/vsphere-client to go to the vSphere Web Client, https://vmatestlab02.testlab.com/ui to go to the HTML5 client or click the https://vmatestlab02.testlab.com:443 to go to the Appliance Getting Started Page.

Click Close

2.5.13

After logging into the HTML5 client for vmatestlab01.testlab.com, you can click Linked vCenter Server Systems to validate Enhanced Linked Mode.

2.5.14

Conclusion

Deploying the vCenter Server Appliance using embedded PSCs is now the way forward since vSphere 6.5 U2 and vSphere 6.7, utilising VCSA HA for high availability if your solution requires. VMware has done a really good job of simplifying the deployment. As previously stated, always review the vSphere Installation and Setup Guide for full details of the prerequisites and details steps, validating product interoperability in your environment by reviewing the VMware Product Interoperability Matrices along with reviewing the VMware KB Supported and deprecated topologies for VMware vSphere 6.5 (2147672) for supported deployment topologies.


Deploy Embedded PSC with Enhanced Link Mode – Part 1

vSphere 6.7 was released in April 2018 which included many new features and enhancements. Following on from this release, vSphere 6.5 Update 2 was released in May 2018, which included some features from vSphere 6.7. As vSphere 6.7 was released prior to vSphere 6.5 U2, there is not a supported upgrade path from vSphere 6.5 U2 to vSphere 6.7. This should be carefully considered in any implementation or future upgrade plans. I expect there will be a supported upgrade path from vSphere 6.5 U2 to a future minor version release of vSphere 6.7.

vCenter Server 6.5 Update 2 now supports Enhanced Linked Mode (ELM) when the vCenter appliance is deployed with an embedded Platform Services Controller (PSC). Previous versions required external PSCs to enable ELM. The VMware KB Supported and deprecated topologies for VMware vSphere 6.5 (2147672) still needs further updates as there is only the following note at the bottom of the article:

Note: With vCenter Server 6.5 Update 2, you can deploy by using the GUI or CLI installer up to 15 vCenter Server Appliance instances in Embedded Linked Mode, and manage these instances with the vSphere Web Client or vSphere Client from any of the instances.

The recommendation from vSphere 6.5 U2 and vSphere 6.7 onwards, is to use Embedded PSCs. The caveat is that this is only for greenfield deployments, there is not a currently supported method to upgrade or migrate from external PSC deployment to an embedded PSC deployment.

Due to an issue with expiring PSC Machine SSL certificates in my homelab and challenges replacing these, I decided to deploy vCenter 6.5 U2 using embedded PSCs. I will be deploying a single SSO domain in a single SSO site. As you will notice during this deployment guide, there is not an option to create another SSO site when joining an existing SSO domain, this is due to SSO sites no longer being required for new deployments.

Please review the vSphere Installation and Setup Guide for full details of the prerequisites and details steps, along with validating product interoperability in your environment by reviewing the VMware Product Interoperability Matrices.

The vCenter 6.5 U2 appliance installation is broken into two stages, the first stage is to deploy a new appliance and the second stage is to complete the new 6.5 U2 appliance setup and configure vCenter Single Sign-On, then start the services of the newly deploy vCenter 6.5 U2 appliance.

I’ll assume you know how to download the required ISOs from the VMware website. I will be deploying the PSC/VCSA topology shown in the image below:


2.4.1

Image acknowledgement from VMware blog

Stage 1 – Deploy the new vCenter Server Appliance

In stage 1, I will deploy the OVA file of the vCenter 6.5 U2 appliance. Mount the ISO and navigate to the \vcsa-ui-installer\ directory and then to the required subdirectory for your OS:

  • For Windows OS, go to the win32 subdirectory, and run the installer.exe
  • For Linux OS, go to the lin64 subdirectory, and run the installer
  • For Mac OS, go to the mac subdirectory, and run the Installer.app

I’m running my deployment from a Windows machine so I will run \vcsa-ui-installer\ win32\installer.exe

2.4.2

Select Install from the vCenter Server Appliance 6.5 U2 Installer

2.4.3

The introduction provides an overview of the stages required to complete the installation.

Click Next

2.4.4

Select the I accept the terms of the license agreement checkbox

Click Next

2.4.5

Select the vCenter Server with an Embedded Platform Services Controller radio button

Click Next

2.4.6

Enter the ESXi host FQDN where you would like the new vCSA 6.5 U2 appliance deployed.

Click Next

2.4.7

Click Yes on the Certificate Warning to continue.

2.4.8

Enter the name for the VCSA appliance VM and set a root password.

Click Next

2.4.9

Select the deployment size you would like for your environment. For my home lab, I selected Tiny

Click Next

2.4.10

Select a datastore for the VCSA and if you would like to enable Thin Disk Mode.

Click Next

2.4.11

Now select a network with ephemeral port binding, this is temporary and the new VCSA appliance can be moved to another network after the installation has completed.

Enter the required network configuration.

Click Next

2.4.12

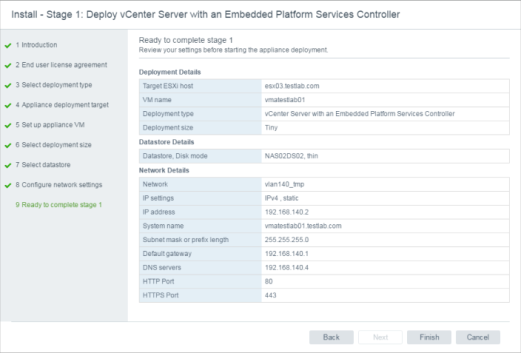
Review the summary on the Ready to complete stage 1 page, verify the settings and then click Finish

2.4.13

Once the deployment has completed, click Continue to progress to Stage 2. If you close, you can continue with Stage 2 by navigating to the VAMI of the newly deployed vCenter Server appliance, https://vmatestlab01.testlab.com:5480

I will continue with the VCSA appliance configuration and SSO setup in Deploy Embedded PSC with Enhanced Linked Mode – Part 2.


Retiring Certifications and Exams

VMware has recently announced the following VMware Certified Advanced Professional exams are due to expire at the end of September 2018. If you are currently studying for one of these exams, you may want to accelerate your study and schedule the exam soon before availability reduces.

2.3.1

All available exams and certification are detailed on VMware’s certification site and announcements are made in the Education Services blog. For a list of retired or retiring certification exams, you can find information in the Retired Certifications and Exams document.


/> vi Kernel

All things SDDC

Default Reasoning

Construction of sensible guesses when some useful information is lacking and no contradictory evidence is present…

2vSteaks

Cloud Automation, vRA, vRO, API and more...

Virtual-Stones Blog

Virtualisation and Cloud Ramblings

Welcome to The Virtually Connected!

All Things Cohesity and VMware Related