In this post, I will be looking at the vRealize Automation 8 Easy Install deployment option. Since the release of vRealize Automation 7, VMware has been making significant improvements in the vRA deployment process to what we experienced in vCAC 6.x. The vRA 8 Easy Installer provides a step-by-step wizard to deploy vRealize Automation (vRA), Workspace ONE and vRealize Lifecycle Manager (vRLCM). I will be using the Easy Install option to deploy these components.
The vRealize Automation documentation can be found at VMware vRealize Automation Documentation. Ensure you check the vRealize Automation documentation for the latest information and requirements.
Required System Resources
The following table provides details of the system resources required to install vRA, vRLCM and vIDM.
| Requirements | vRealize Lifecycle Manager | Identity Manager | vRealize Automation |
|
Total Storage |
48 GB |
60 GB |
222 GB (Single node installation) |
|
Virtual CPU |
2 |
2 |
2 |
|
RAM |
6 GB |
6 GB |
32 GB |
|
System Partition |
10 GB |
8 GB |
50 GB |
|
Data Partition |
20 GB |
|
144 GB |
|
Metrics Partition |
|
|
20 GB |
|
Logs Partition |
|
|
8 GB |
|
Swap Size |
8 GB |
6 GB |
|
|
Tomcat Partition |
|
10 GB |
|
|
Var Partition |
|
10 GB |
|
|
db Partition |
10 GB |
10 GB |
|
Network Requirements
All components within the deployment will require the following network configuration items:
- Static IP Address (IPv4)
- Network Mask
- Default Gateway
- DNS Server(s)
- Domain Name
- NTP Server
Ports and Protocols
VMware has recently released the VMware Port and Protocols site. Please reference this site for details of the vRealize Automation 8.0 Ports and Protocols requirements.
DNS and Host Name Resolution
All components must be able to resolve each other by using a fully qualified domain name (FQDN). A DNS A and PTR entry must exist for all nodes providing forward and reverse name resolution for all nodes.
Installation Overview
Once the pre-requisites are in place, the vRA Easy Installer deployment procedure will follow the high-level steps below:
- Download the vRealize Automation 8 Easy Installer
- Access the vRealize Automation Easy Installer
- Specify appliance deployment parameters
- Install vRealize Suite Lifecycle Manager 8.0
- Specify vRealize Lifecycle Manager configuration parameters
- Install VMware Identity Manager 3.3.1
- Specify Identity Manager configuration parameters
- Install vRealize Automation 8.0
- Specify vRealize Automation configuration parameters
vRealize Automation 8.0 Installation
Download the vRealize Automation 8.0 ISO file from My VMware.
Mount the vra-lcm-installer.iso disk image to the local system and navigate to the folder, which is dependant on the operating system you are using:
|
Operating System |
File Path |
|
Windows |
lcm-installer\vrlcm-ui-installer\win32\installer.exe |
|
Linux |
|
|
Mac |
vrlcm-ui-installer/mac/Installer/Installer.app |
After running the appropriate installer file (depending on the OS), the vRealize Easy Installation Wizard will start.

Click Install.

Click Next.

On the End User License Agreement page, select the checkbox for I accept the terms of the license agreement
Optionally select if you would like to join the VMware Customer Experience Improvement Program (CEIP)
Click Next.

Enter the Appliance Deployment Target information:
- vCenter Server Hostname
- HTTPS Port
- Username
- Password
Click Next.

Click Accept on the Certificate Warning to continue.

Select the target compute cluster within the vCenter inventory for the deployment of the appliances.
Click Next.

Select the target datastore or datastore cluster for the deployment of the appliances.
Check Enable Thin Disk Mode if would like to enable thin provisioning for the deployment.
Click Next.

Enter the required network configuration.
Click Next.

Enter and confirm a password for the various accounts specified.
Click Next.

Enter the required Lifecycle Manager configuration items.
Click Next.

Enter the required Identity Manager configuration items.
Click Next.

Enter the required vRealize Automation configuration items.
Click Next.

At the Summary page, validate all of the entered information.
Click Submit.


The installation will now progress and complete, assuming there are not any issues, and you will be provided with a screen showing the vRLCM and vRA URLs upon completion.
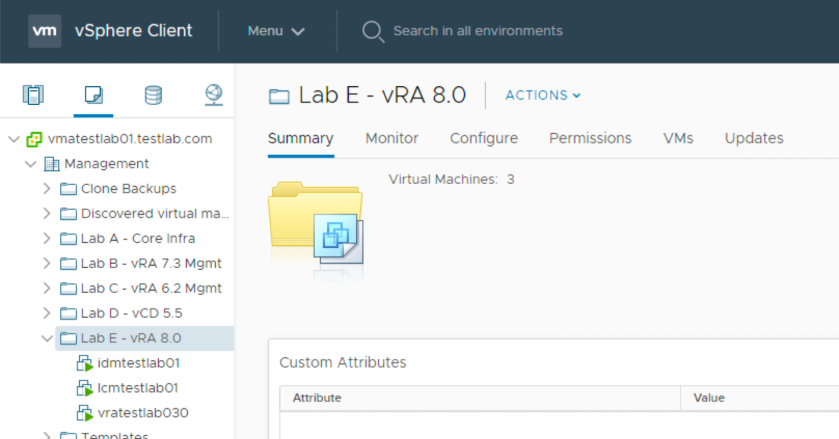
The vCenter inventory screen shows the Identity Manager, LifeCycle Manager and vRealize Automation appliances have all deployed successfully to the target VM folder specified during Easy Install wizard.
Overall, VMware has made significant advances in simplifying the installation process of vRA 8 over previous releases, and have now updated the vRA architecture and embedded application services into VMware appliances, thus remove the dependency of Microsoft Windows and Microsoft SQL server for the IaaS components.
